


Some amazing tips & tricks for Cinema 4D and Octane
There are some great tips and tricks to speed up your workflow with Cinema 4D and Octane. In this article today, VFXRendering going to round up some of those from CGshortcut and Greyscalegorilla. Let’s find out the details right here.

Table of Contents
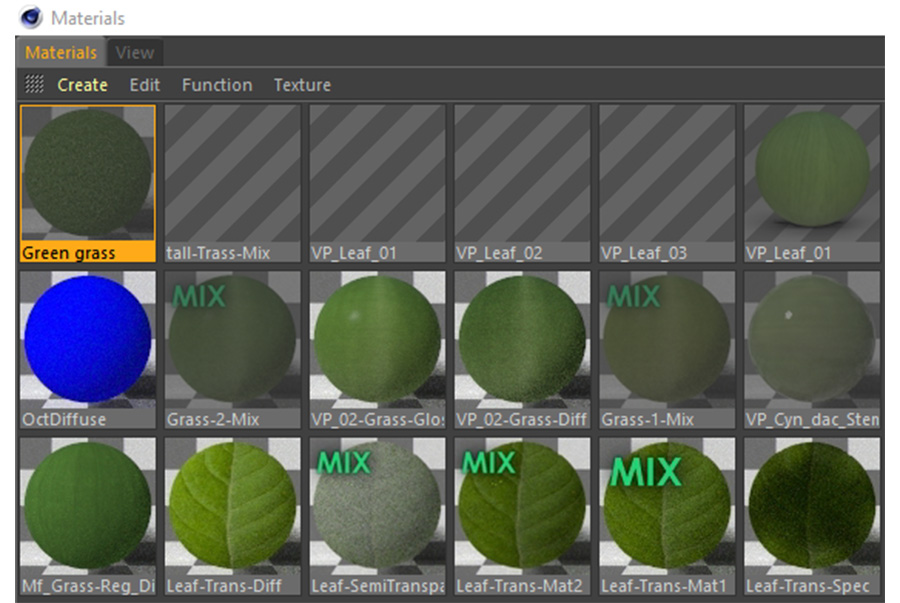
Fix the material issue in Cinema 4D
While using Cinema 4D, there is no less than one time you encounter a situation: the material preview disappears. For example, you have three materials, these two materials build up this mixed material but one of the mixed materials is not showing up on the thumbnail (a preview). It is showing up like plain white and the materials are just showing up blank. Or sometimes will notice that the material in this materials editor view is visible but down off in the material window is not.
So how do we solve this issue? So simple. You just need to right-click on the material window and refresh it. After that, you will see all materials at the bottom.
Hair Emission
In this case, you want to have a spline render in Octane and you need to put on the Octane object tag. After you render it, it’s not light up. So what is the problem, and how to actually light up that?
To fix the issue, we also use super fast tips like another one, which is hair emission. Let’s follow some steps below:
Step 1: Open your Octane node editor and grab a blackbody emission.
Step 2: Plug this into the emission object.
You need to check on surface brightness, you will see the line is very light and the objects light up.
Fake shadows or light through glass
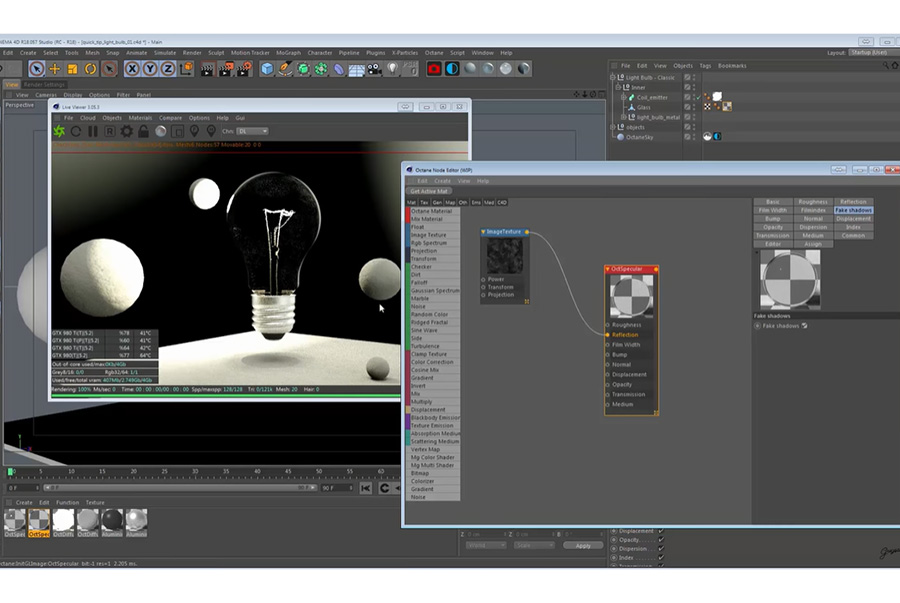
The fake shadows are the next step of tips for Cinema 4D and Octane. These tips will help you create light through glass. The light through the glass makes some objects such as light bulbs, and cups,… more realistic. We will go to the case with light a light bulb.
When you started working and building like a light bulb, the filament inside that light bulb you want to actually light up your scene. It can be tricky sometimes when you finish but not getting results. It can make you really annoyed and frustrated.
To fix this problem, the first step, you need to set up the Live viewer and see the viewer window. You are not really getting any of your emissions from your objects. Then, open the materials and you can see that life itself is a blackbody emission and it is emitting light but the weird thing is it doesn’t matter. You need to give it a hundred. If it not lighting up, let’s put it a thousand.
Next, you need to check the glass material itself. You can see that have a little smudge of material. Just to give this glass a little bit better reflection and appearance. Inside the glass, we need to check it’s all within the specular material is fake shadow and when you check on fake shadow just like that it allows the glass to be seen as a transparent object with light. Now, the blackbody emission on this filament is allowing it to go through this outer glass material.
With some simple clicks, you can light up them. But if you don’t do that, you will never go to light up the objects in your scene and put shadows on themself.
Cinema 4D noise
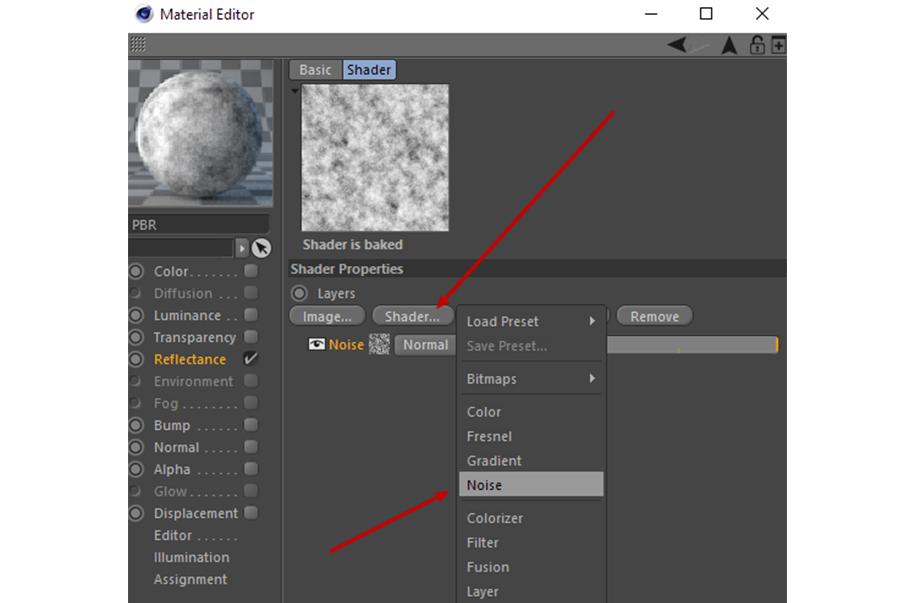
In this case, we going to explore how to create noise right in Cinema 4D. We take an example of a planet and we want to add a texture with noise to it.
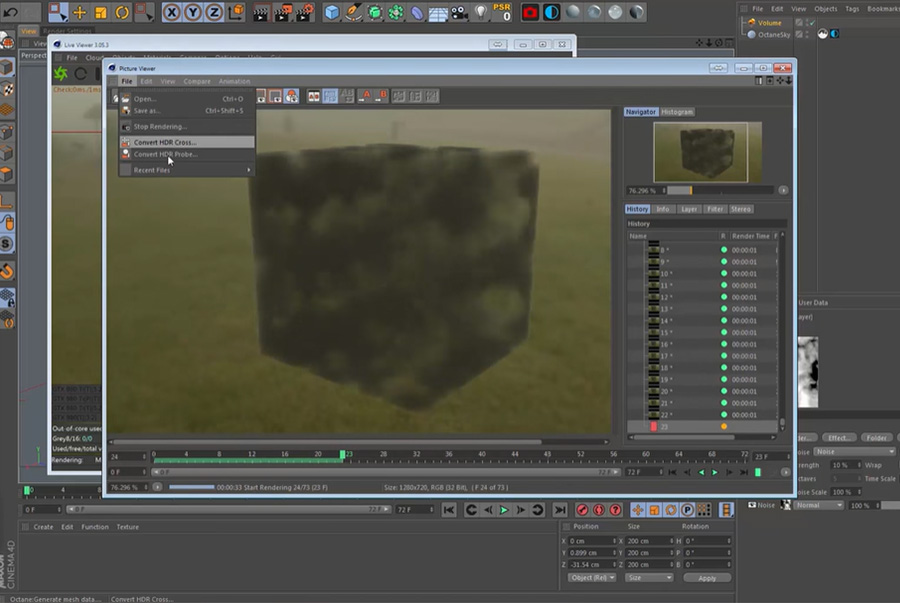
To create a planet, we have got a simple sphere, then click over the object in the Live Viewer and we will create a new Octane Glossy material that should automatically be applied to our object. After that, we grab them and open the Node Editor. Let’s get some noise on here, so, we have available down the left and we click on the Cinema 4D tab. We will get the ones that are native to Cinema 4D and we can use them with Octane render. Let’s grab a noise and bring that in and link it with diffuse and to the bump. When you go into that noise, we can add more detail. After that, we render it, but it is not looking great.
How do fix this problem, just simple, we need to make the noise a bit bigger. And we should look at the Octane setting to change. Let’s look at the Cinema 4D shader tab and find the problem. When an Octane render Cinema 4D shader includes noise, it converts it into texture and loads that into the RAM, and this render size is how big that texture is going to be right. In our case, it’s only 128 pixels by 128 pixels. We need to creak that up to 2K.
Finally, we need to close that and restart the render and you can see, we are fixed all. You can see it is looking a lot more like a planet.
Fog Animation
Let’s jump into fog animation. When animating fog, there’s no real way of doing it within Octane. So what we can do? In this case, many 3D artists will load VVD to be filed. But you can do it another way, with this way, fog animation will be realistic and actually have the fog animate throughout.
With short scenes and it wasn’t enough time to see the individual turbulence in the fog transforming, you can keyframe the fog animate it slowly on one of the axes, but the fog doesn’t transform and that really gives it the look animating.
With log scenes or if you want to more detail the fog animation, you need to start with the texture itself, you might have tied adding noise before. In the texture itself, we going to change it from just plain noise to a layer. In this layer, we are going to go into effect and distort. The fantastic thing is we can actually keyframe this layer and keyframe this timescale of this. At frame zero, we going to make a keyframe, then, all the way down at frame 72. Finally, we can see the results, you can do this step less or more. It depends on your kind of change over time per your animation.
There are 5 amazing tips and tricks you can do to increase your workflow with Cinema 4D and Octane render. VFXRendering hopes the sharing will help you. Please comment below if you have any questions.
See more: Choose the best render farm for Cinema 4D and Octane project


No comments