


Redshift Denoiser Consistency Across a Houdini Sequence
Redshift denoiser flicker can turn a clean-looking Houdini render into a distracting animation. Maxon warns that Redshift denoises frames independently, so residual noise may change from frame to frame and appear as flickering patches. Start by disabling Randomize Pattern on Each Frame to keep the noise pattern consistent. Next, improve sampling so the denoiser only needs to remove a small amount of remaining noise. If flickering persists, add Diffuse Albedo and Bump Normals for Redshift built-in denoisers, then consider exporting Motion Vectors for temporal denoising with Houdini’s idenoise or Denoise AI using OptiX. This workflow uses information across the previous denoised frame to improve consistency. However, enabling the Motion Vector AOV in Redshift disables motion blur in the beauty render, so plan your rendering setup accordingly.
A frame can look perfect in RenderView, yet the finished animation may tell a different story. At 24 fps, dark areas and volumes can appear to boil as you play the sequence. The problem behind Redshift denoiser flicker often lies between frames, where independent denoising cannot maintain temporal consistency.
Table of Contents
What Redshift’s Three Denoisers Actually See
What Redshift’s Three Denoisers Actually See
| Denoiser | Hardware / availability | Required guide AOVs | Temporal? | IPR / progressive? |
| OptiX | NVIDIA GPU | Diffuse Albedo, Bump Normals | No in Redshift; yes in Houdini with motion vectors + previous frame | Yes; very fast |
| OIDN | CPU or supported GPU; included with Houdini | Diffuse Albedo, Bump Normals | No | Yes; fast |
| Altus Single | Non-interactive; bucket rendering only | Diffuse Albedo, World Position, Bumped Normal | No | No; renders the frame once, then denoises |
| Altus Dual | Non-interactive; bucket rendering only | Diffuse Albedo, World Position, Bumped Normal | No | No; renders the frame twice, then denoises |
The key point: Maxon’s documentation does not describe any of these three denoisers as using neighboring frames. OptiX, OIDN, and Altus all process individual frames, so the same noisy area may be denoised differently in frame 101 and frame 102.
The Setting Maxon Tells You to Change First
In Redshift, Random Noise Pattern, also known as Redshift Randomize Pattern on Each Frame, changes the sampling noise pattern between animation frames. When enabled, which is the default behavior, the noise shifts from frame to frame, much like television static or film grain. When disabled, the pattern stays more consistent across consecutive frames.
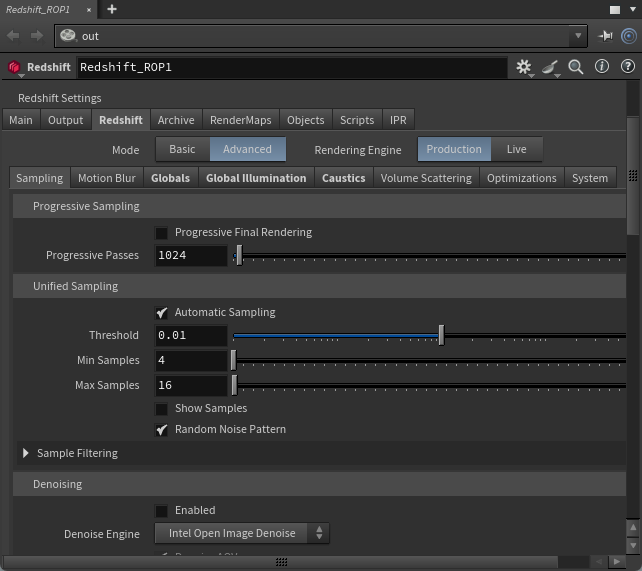
For animation without denoising, stationary noise is usually undesirable. However, Maxon recommends disabling this setting when denoising because a more consistent noise pattern can help the denoiser produce steadier results across frames.
To test the difference, render the same 30-frame sequence twice, once with Random Noise Pattern enabled and once with it disabled. Compare both versions at normal playback speed rather than inspecting individual frames.
Give the Denoiser Less to Guess
Use denoising as a final cleanup pass rather than relying on it to rescue very noisy renders. In practice, aggressive denoising can erase fine details, soften edges, and create unnatural, waxy surfaces. These artifacts become especially noticeable in animation, where they can change between frames and produce distracting flicker.
In Houdini scenes, pay particular attention to Pyro volumes, dark interior areas, motion blur, and depth of field. Increase sampling in these demanding regions before raising sample settings across the entire scene.
Redshift also adds denoising overhead, which varies by rendering mode. Bucket rendering uses 10% of frame render time by default, while progressive rendering uses 100%. Setting both values to zero delays denoising until the end of the frame. Check these settings before submitting a batch job to a render farm.

Going Temporal Inside Houdini
When frame-by-frame denoising cannot eliminate flicker, Houdini idenoise temporal workflows (with OptiX only) can use information from previous frames to improve consistency across an animation.
- Export EXR files from Redshift. Include the noisy beauty pass, Diffuse Albedo, Bump Normals, and motion vectors.
- Load the sequence into Houdini. Use idenoise or the Denoise AI node in Copernicus.
- Configure OptiX inputs. Assign the albedo, normal, and motion vector planes using the -a, -n, and -m options. The option values must match the exact EXR plane names.
- Provide the previous denoised frame. Connect it through the previous-frame input, such as -p or prevframe. For the first frame, use the noisy beauty image with a zero motion vector, following SideFX guidance.
- Process frames sequentially. Each frame needs the previous denoised result, so the sequence cannot be processed independently in arbitrary order.
Watch out for motion blur: Enabling the Motion Vector AOV in Redshift disables motion blur in the beauty render. Plan your AOV setup before rendering the sequence.
Which Path for Which Shot
Here are some common rendering situations and the denoising approach we recommend trying first.
Which Path for Which Shot
| Situation | Recommended First Approach |
| Look development and quick IPR previews | OptiX in Redshift |
| Still frames and posters | OIDN or Altus in Redshift |
| Animation with light noise | Disable Randomize Pattern on Each Frame and denoise in Redshift |
| Animation with Pyro, dark areas, or persistent flicker | Increase sampling in difficult areas, then apply temporal denoising in Houdini |
| Shots requiring precise compositing control | Export noisy EXRs with the necessary AOVs and denoise in a later stage |
Running the Entire Workflow on a Cloud Workstation
On an iRender cloud workstation, you can work in Houdini much as you would on your local machine. Render with Redshift, then run idenoise or Copernicus on the same workstation before downloading the results. Available configurations include RTX 4090 and RTX 5090 GPUs, with options for one to eight cards and 256GB of RAM. You should provide your own software licenses.
If you prefer to download noisy beauty passes and AOVs for denoising at home, plan for larger files. These EXRs can occupy several times more storage than denoised frames, and transferring them takes additional time.
Maximum Speed – Absolute Freedom. Take control of your VFX workflow with iRender’s dedicated GPU servers. Render with iRender →
FAQ
Why does my Redshift denoised animation flicker?
Redshift denoises frames independently, so small differences in residual noise can create visible flickering during playback. Disable Randomize Pattern on Each Frame and increase sampling in difficult areas. If Redshift denoiser flicker persists, try temporal denoising in Houdini with motion vectors and information from previous frames.
Should I turn off Randomize Pattern on Each Frame in Redshift?
Yes, it is worth testing for animation that uses denoising. Disabling this setting keeps the sampling noise pattern more consistent between consecutive frames, which can help reduce flicker. Render a short sequence with the setting both enabled and disabled, then compare the results at normal playback speed.
Is Altus temporal in Redshift?
Maxon’s documentation describes Altus as a denoiser for individual frames, not as a temporal denoiser that uses neighboring frames. Therefore, you should not assume that Altus maintains consistency by referencing previous or subsequent frames. If you need temporal processing, consider a workflow in Houdini.
Can Houdini denoise Redshift renders temporally?
Yes. Houdini can use idenoise or Denoise AI with OptiX only for temporal denoising workflows. Export the noisy beauty pass, albedo, normals, and motion vectors from Redshift. The process can then use the previous denoised frame to improve consistency, although frames must be processed sequentially.
See more: Rendering Houdini Sim Caches with Redshift on a Farm







Pingback:Octane vs Redshift in Houdini: Look Dev Compared | 18 November, 2026
|