


How to render a Cinema 4D & Redshift project on RebusFarm
RebusFarm is a well-known render farm, they have been working in the industry for a long time. They support lots of industry-standard 3D software, including Cinema 4D and Redshift. Learn how to render a Cinema 4D & Redshift project on RebusFarm with us in this article.
Table of Contents
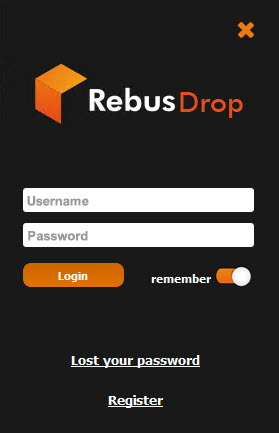
1. Create an account and set up RebusDrop
First of all, you need to create an account at RebusFarm. Next, download RebusDrop to your computer and install it. Login your account. Rebus software will integrate into your 3D application and ready to use.
Note:
- You should close Cinema 4D before installing RebusDrop.
- I have trouble installing RebusDrop when it doesn’t show up in Cinema 4D interface. I fix it by manually re-install the plugin for C4D following this instruction.
2. Submit the project
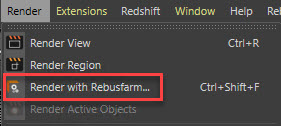
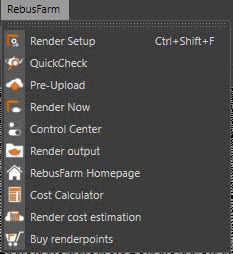
Open the Rebus setup window in one of these ways:
- Render > Render with Rebusfarm
- Rebusfarm > Render Setup
- Ctrl + Shift + F
Next step is to configure your settings.
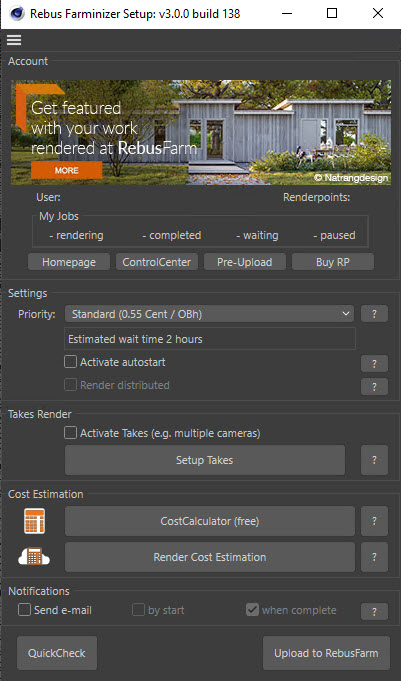
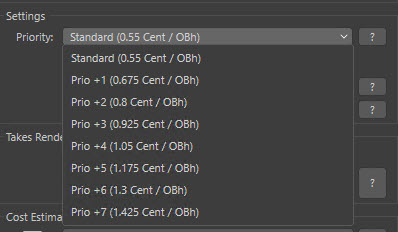
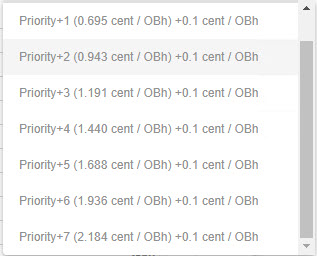
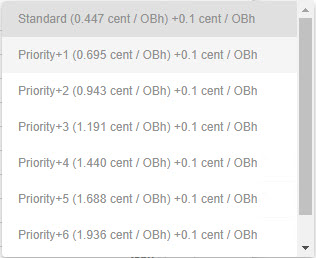
Priority: There are 8 priorities. If you choose higher priority, the job will move up in the queue. In other words, it will be rendered sooner.
The estimated wait time is just for reference. The real wait time will depend on the jobs are actually in queue at that time.
Activate autostart: This function allows your rendering to go straight to the render queue after the upload is finished. If disabled, you need to start the render manually in the ControlCenter after the upload.
Render distributed: Still images only. Your job will be split and sent to different nodes to render. This option is quicker, and of course more expensive.
Activate takes: Allows you to render a scene with multiple cameras in one go.
Cost Estimation
- Cost Calculator: free, rough estimation based on your computer hardware details.
- Render Cost Estimation: more precise, charged for the test frames.
Notification: You can choose to receive notification email when your rendering starts/completes.
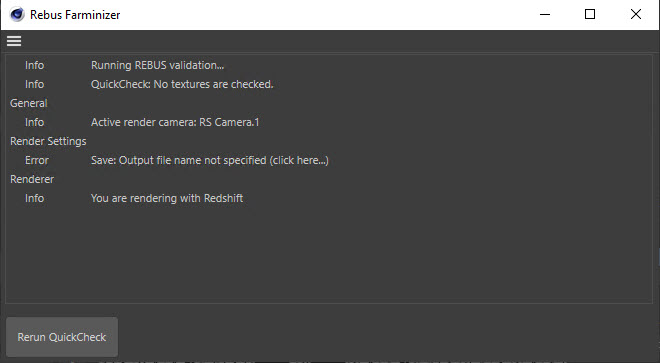
After that, you can either click QuickCheck or Upload to RebusFarm. The plugin will check the project, give the general information and errors. You need to fix the error before being able to submit the job to the farm.
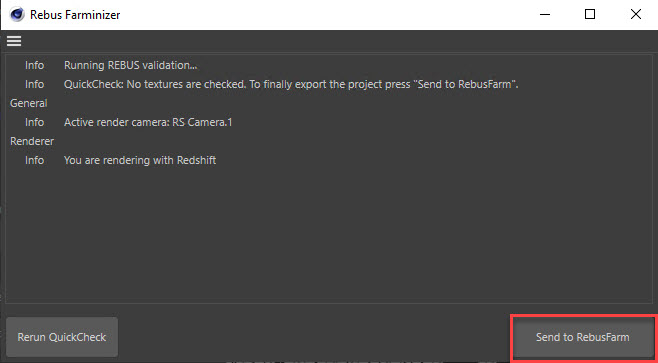
Click Send to RebusFarm to upload project, and go to ControlCenter for monitoring.
3. Monitor render progress and download the results

When the upload is finished, the job will automatically go to the queue (if you activate autostart) or you click Start the render, and wait for its turn to render. During the process, you can:
- Change the priority: the new priority will be applied for frames that haven’t started rendering. The current frame that is being rendered will continue with the chosen priority and price.
- Cancel the render: Stop rendering, lose the process (and render points) so far.
Note: The price of priorities in ControlCenter is different from those in RebusDrop plugin.
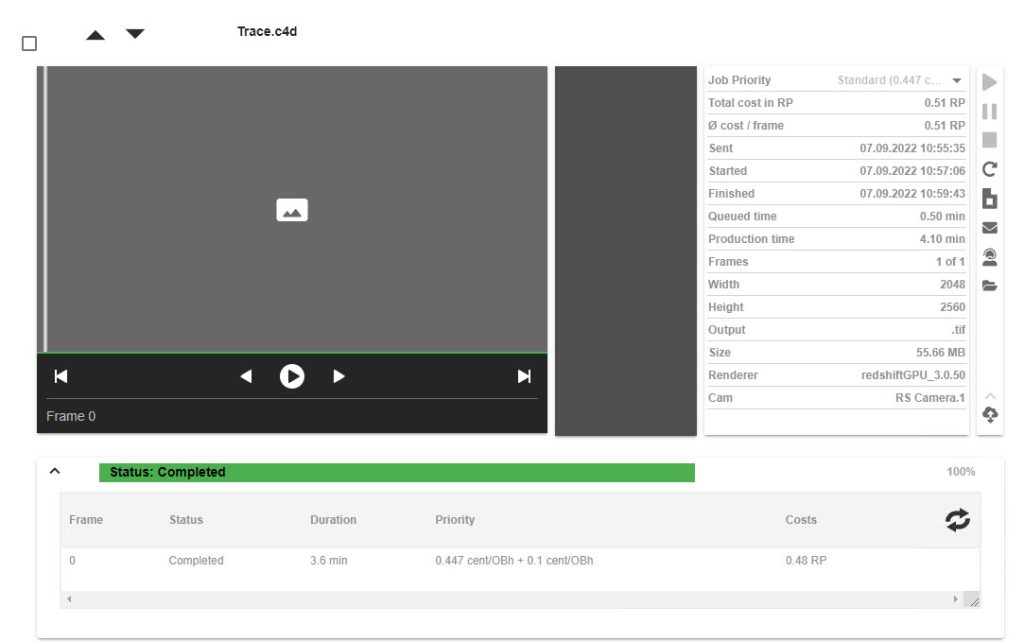
After the render is completed, the output will be automatically downloaded to the local folder via RebusDrop. Also, you can check the details about render process on the farm in each job, including total cost, queued time, render time, etc.
4. Test results
For the test, we will use “Trace” project made and shared by TFMSTYLE.
| Priority | Render Points | Render Time | Queued Time |
| Standard | 0.51 | 3.6 min | 0.5 min |
| Priority +1 | 0.52 | 4.5 min | 0.07 min |
| Priority +2 | 0.82 | 2.9 min | 0.28 min |
| Priority +3 | 1.51 | 3.9 min | 0.37 min |
| Priority +4 | 1.53 | 3.5 min | 0.32 min |
| Priority +5 | 1.45 | 3.7 min | 0.22 min |
| Priority +6 | 2.03 | 3.8 min | 0.3 min |
| Priority +7 | 2.31 | 3.6 min | 0.32 min |
5. Conclusion
- Rebusfarm workflow is straightforward and quite easy. You might have issue installing RebusDrop in the 1st time.
- Priority doesn’t affect the render time, it just let you to move up in the render queue. In other words, less queued time. But the wait time depends on the number of jobs in the queue at that time. If there are not many jobs, the higher priority make no difference.
- The higher priority, the more expensive render cost. If you are not hurry, Standard Priority is the best. You can choose higher priority later if the wait time is too long.
- This is our detailed instructions for you to have a better understanding. We also test render time and cost between priority options for one same project for reference. It’s better to test your own project by yourself.
If there’s anything you want us to clarify, please leave a comment below
See more:


No comments